In this post (here), you had the chance to meet both Woolhe and Flat, my knitted soft toys.
Today, I would like to show you how to knit Flat, but a new version of it! Infact, I usually knitted this funny guy using the basket stitch (where you alternate stockinette stitch with garter stitch), but in this post I'll show you how to knit Flat using the moss stitch, instead!
What you need to start:

Flat is worked in one piece, so that to reduce the sewing seams! You'll start to knit one of its legs, continuing with the body, the two arms and finishing with the other leg!
cast on 5 stitches
rows 1-40 : K, P, K, P, K repeat this row 40 times
when completed row 40, add (cast on) 10 more stitches (on your knitting needle you'll have 15 stitches)
rows 41-48 : K, P, K, P, K, P, K, P, K, P, K, P, K, P, K repeat this row 8 times
when completed row 48, cast on 10 stitches (on your knitting needle you'll have 25 stitches)
rows 49-56 : (K, P) 12 times, K last stitch
row 57 : cast off 10 stitches, (K, P) 7 times, K last stitch (15 stitches on your knitting needle)
rows 58-87 : (K, P) 7 times, K last stitch repeat this row 30 times
when completed row 87, add 10 stitches (25 stitches on your knitting needle)
rows 88-95 : (K, P) 12 times, K last stitch
row 96 : cast off 10 stitches, (K, P) 7 times, K last stitch (15 stitches on your knitting needle)
row 97-103 : (K, P) 7 times, K last stitch repeat this row 7 times
row 104 : cast off 10 stitches, K, P, K, P, K (5 stitches left on your knitting needle)
rows 105-144 : K, P, K. P, K repeat this row 40 times
cast off
So, now you can follow the pattern step by step, starting from my note book (!!!)

Ok! Cast on 5 stitches and knit in moss stitch the first 10 rows

Continue in the same way (see pattern), and at the end of row 20, Flat's first leg will be like that

After row 30

After row 40

Just completed row 40, cast on 10 more stitches (you'll start Flat's body with those ones)

So, follow again the pattern from row 41 to row 48 (body shaping)

Completed row 48, cast on 10 more stitches : the first arm is ready to be knitted, for the following 8 rows

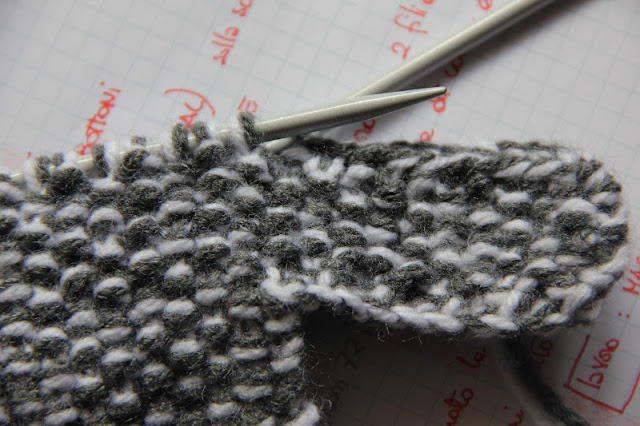
So, the first arm is quite done! Now, you'll start to knit row 57 : cast off the first 10 stitches, then (K, P) 7 times, K last stich (15 stiches left on the knitting needle) and the arm is free!!! Can you see it?

From row 58 to row 72 : (K, P) 7 times and then K the last stitch. The first half of Flat is done!!!


Continue to follow the above part of the pattern, (K, P) 7 times and K last stitch, to the end of row 87

and if you fold your work, in a way that the knitting needle meets the knitted arm, you'll see the head of our little guy...


Ok! So now, add 10 stitches : you'll start Flat's second arm!!!

At the end of row 88

Once the arm is completed, your Flat will be like


and if you fold your work, you will see

At the beginning of row 96 cast off the first 10 stitches, so that

while at the end of the same row


From this point, follow the pattern :
row 97-103 : (K, P) 7 times, K last stitch repeat this row 7 times
.....and fold your work.....


Now, we start row 104 : cast off the first 10 stitches, and K, P, K, P, K you have 5 stitches left on your knitting needle!

With these 5 stitches, start to knit Flat's second leg, from row 105 to row 144 (follow pattern)


Flat is almost done!!!
Please note : to complete your FLAT you need to read this POST !!!! Have fun !!!!
We'll complete this funny little monster after the second part of the tutorial will be released! In the meantime, please, be patient, and knit a bunch of Flats-to-be!!
Any problem/question related to this pattern, please contact me here !!!!
Enjoy your knitting and thank you!
My Ravelry notes can be found HERE !!!!
See you soon, xxxx
Remember to enter MY FIRST GIVEAWAY right here !!!!
Today, I would like to show you how to knit Flat, but a new version of it! Infact, I usually knitted this funny guy using the basket stitch (where you alternate stockinette stitch with garter stitch), but in this post I'll show you how to knit Flat using the moss stitch, instead!
What you need to start:

- 2 balls of acrylic (or the fiber you prefer!) yarn in contrasting colours
- a pair of straight knitting needles 4mm or 5mm
- a pair of scissors
- for other notions, please wait for "Make it! Flat in moss stitch (part two)", thank you!!
- cast on (knitted cast on method or thumb method)
- knit stitch (K)
- purl stitch (P)
- binding ( or casting) off
Flat is worked in one piece, so that to reduce the sewing seams! You'll start to knit one of its legs, continuing with the body, the two arms and finishing with the other leg!
cast on 5 stitches
rows 1-40 : K, P, K, P, K repeat this row 40 times
when completed row 40, add (cast on) 10 more stitches (on your knitting needle you'll have 15 stitches)
rows 41-48 : K, P, K, P, K, P, K, P, K, P, K, P, K, P, K repeat this row 8 times
when completed row 48, cast on 10 stitches (on your knitting needle you'll have 25 stitches)
rows 49-56 : (K, P) 12 times, K last stitch
row 57 : cast off 10 stitches, (K, P) 7 times, K last stitch (15 stitches on your knitting needle)
rows 58-87 : (K, P) 7 times, K last stitch repeat this row 30 times
when completed row 87, add 10 stitches (25 stitches on your knitting needle)
rows 88-95 : (K, P) 12 times, K last stitch
row 96 : cast off 10 stitches, (K, P) 7 times, K last stitch (15 stitches on your knitting needle)
row 97-103 : (K, P) 7 times, K last stitch repeat this row 7 times
row 104 : cast off 10 stitches, K, P, K, P, K (5 stitches left on your knitting needle)
rows 105-144 : K, P, K. P, K repeat this row 40 times
cast off
So, now you can follow the pattern step by step, starting from my note book (!!!)

Ok! Cast on 5 stitches and knit in moss stitch the first 10 rows

Continue in the same way (see pattern), and at the end of row 20, Flat's first leg will be like that

After row 30

After row 40

Just completed row 40, cast on 10 more stitches (you'll start Flat's body with those ones)

So, follow again the pattern from row 41 to row 48 (body shaping)

Completed row 48, cast on 10 more stitches : the first arm is ready to be knitted, for the following 8 rows

So, the first arm is quite done! Now, you'll start to knit row 57 : cast off the first 10 stitches, then (K, P) 7 times, K last stich (15 stiches left on the knitting needle) and the arm is free!!! Can you see it?

From row 58 to row 72 : (K, P) 7 times and then K the last stitch. The first half of Flat is done!!!


Continue to follow the above part of the pattern, (K, P) 7 times and K last stitch, to the end of row 87

and if you fold your work, in a way that the knitting needle meets the knitted arm, you'll see the head of our little guy...


Ok! So now, add 10 stitches : you'll start Flat's second arm!!!

At the end of row 88

Once the arm is completed, your Flat will be like


and if you fold your work, you will see

At the beginning of row 96 cast off the first 10 stitches, so that


while at the end of the same row


From this point, follow the pattern :
row 97-103 : (K, P) 7 times, K last stitch repeat this row 7 times
.....and fold your work.....


Now, we start row 104 : cast off the first 10 stitches, and K, P, K, P, K you have 5 stitches left on your knitting needle!

With these 5 stitches, start to knit Flat's second leg, from row 105 to row 144 (follow pattern)


Flat is almost done!!!
Please note : to complete your FLAT you need to read this POST !!!! Have fun !!!!
We'll complete this funny little monster after the second part of the tutorial will be released! In the meantime, please, be patient, and knit a bunch of Flats-to-be!!
Any problem/question related to this pattern, please contact me here !!!!
Enjoy your knitting and thank you!
My Ravelry notes can be found HERE !!!!
See you soon, xxxx
Remember to enter MY FIRST GIVEAWAY right here !!!!
Comments
Post a Comment
Hi my dear reader!
I'm very happy to see you here! After your visit, feel free to leave a comment!
I love to hear from you and I like to keep in touch!
I'll answer you back asap!!
Thank you and enjoy your day,
xxxx Alessandra